VirtualBMC で VM をベアメタルライクに操作する
この記事は、呉高専 Advent Calendar 2022 の8日目として書きます。
今回は VirtualBMC という KVM ホスト上の仮想マシン(以下、VM) をあたかもベアメタルサーバかのように操作できるという Tips 的なツールを紹介したいと思います。
BMC
VirtualBMC の紹介に入る前に、そもそも BMC とは何でしょうか?
BMC ( Baseboard Management Controller ) とは IPMI 規格に基づいてベアメタルサーバ(いわゆる、物理サーバ)に組み込まれているハードウェアモジュールです。一般的にはエンタープライズレベルのサーバには BMC が組み込まれています。
あらかじめ BMC に設定を入れておくことで、ネットワーク越しにベアメタルサーバ内のハードウェアリソース(CPU、メモリ、など)の状態やサーバの温度を監視したり、サーバのコンソール画面をネットワークを通してまるごと転送することでグラフィカルコンソールを表示することができます。また、BMC の電源とベアメタルサーバ本体の電源は独立しているため、リモートサイトから BMC を通してサーバの電源操作を実施することもできます。
なお、BMC は IPMI 規格に基づいて設計されていることや、後ほど出てくる IPMI コマンドで操作できることからか 「IPMI デバイス」と呼ばれることもあります。また、通常は各ハードウェアベンダによって BMC のための独自のグラフィカルインターフェースが提供されており、ベンダによってその名称が異なるため多少混乱するかもしれませんが、基本的にはその実態は BMC であり機能も大きな差はないかと思います。
ハードウェアベンダごとに異なる BMC グラフィカルインターフェースの名称:
IPMI
今回は VirtualBMC を使用することを目的としているため、BMC の操作はグラフィカルインターフェースではなく ipmitool というコマンドラインクライアントを使用します。したがって、ipmitool の基本的な使い方を簡単に下記に記載しておきます。
(1) 基本的な引数
# ipmitool -I lanplus -H <IP address> -U <user> -P <password> <command>


(2) ベアメタルサーバの電源状態の確認
# ipmitool -I lanplus -H <IP address> -U <user> -P <password> power status


(3) 電源をオン
# ipmitool -I lanplus -H <IP address> -U <user> -P <password> power on


(4) 電源をオフ
# ipmitool -I lanplus -H <IP address> -U <user> -P <password> power off


(5) 次回起動時のブートデバイスを PXE に設定
# ipmitool -I lanplus -H <IP address> -U <user> -P <password> chassis bootdev pxe
VirtualBMC
これまでの説明からもわかるとおり、BMC はリモートサイトからベアメタルサーバの状態を監視または操作するためのものであるため、本来は仮想環境上の VM においては必要のない機能かと思います。
では、どういう場合に仮想環境において BMC が必要になるかというと、開発するソフトウェアもしくは使用するソフトウェアが IPMI 接続を前提としてサーバを操作する仕様となっている状況を想定してみてください。
そのようなソフトウェアの開発環境や検証環境においては、VM を通常のベアメタルサーバのように ipmitool コマンドを使用して操作できれば、別途ベアメタルサーバを用意しなくてよくなります。これは、開発者やソフトウェアの検証を実施したいエンジニアにとっては非常に助かります。
余談:
そもそも IPMI を扱うソフトウェアなんてあまり馴染みがないという方もいるかと思いますので少し紹介しておきます。
近年は AWS、GCP、Azure などのパブリッククラウドが主流であり多くの方はそれらを使用されたことがあると思います。
このパブリッククラウドは、各クラウドベンダが提供するプラットフォーム上のリソースを不特定多数のユーザが共有して使用しているイメージです。
しかし、”パブリック”クラウドがあるということは、当然のその反対の「プライベートクラウド」も存在します。プライベートクラウドは、一般的にはとある会社内でのみで使用する独自のクラウドプラットフォーム(IaaS 基盤)を会社内のユーザ向けに提供するイメージです。
そして、それらの構築のために利用されるソフトウェア群として OpenStack というプロジェクトが存在します。このような IaaS 基盤を構成するソフトウェアは、構築にあたって多数のベアメタルサーバをオーケストレーションすることが求められるため、当然ながら BMC ないしは IPMI を通してそれらを操作することを前提としています。
そして、じつは今回紹介する VirtualBMC は OpenStack プロジェクトにおけるひとつの成果物でもあります。
VirtualBMC の動作
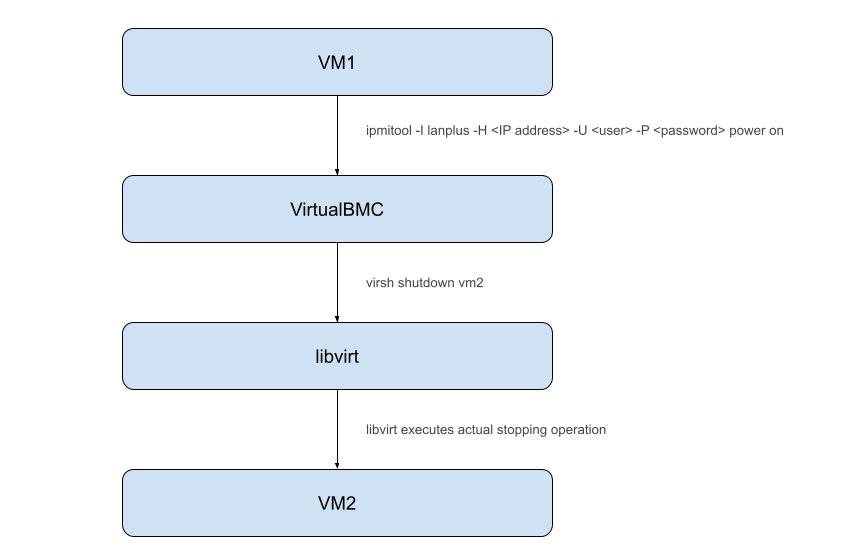
VirtualBMC の仕組みはシンプルで、VirtualBMC サービスが IPMI クライアントと VM が起動しているハイパーバイザ間の仲介役となり、ipmitool コマンドの内容をハイパーバイザ用の命令に変換しハイパーバイザに対して指示を出します。より正確には、ハイパーバイザの手前に libvirt というハイパーバイザの抽象化ライブラリが間に入ります。
デモ
ここからは、デモとともに VirtualBMC の具体的な使用方法について紹介していきたいと思います。
今回の検証環境は下記の通りとなります。
事前準備
(1) OS およびバージョンの確認
# cat /etc/redhat-release
Red Hat Enterprise Linux release 8.4 (Ootpa)


(2) QEMU/KVM では CPU が Intel VT もしくは AMD-V に対応している必要があるため確認
# lscpu | grep -e vmx -e svm
Flags:               fpu vme de pse tsc msr pae mce cx8 apic sep mtrr pge mca cmov pat pse36 clflush dts acpi mmx fxsr sse sse2 ss ht tm pbe syscall nx pdpe1gb rdtscp lm constant_tsc art arch_perfmon pebs bts rep_good nopl xtopology nonstop_tsc cpuid aperfmperf pni pclmulqdq dtes64 monitor ds_cpl vmx smx est tm2 ssse3 sdbg fma cx16 xtpr pdcm pcid dca sse4_1 sse4_2 x2apic movbe popcnt tsc_deadline_timer aes xsave avx f16c rdrand lahf_lm abm 3dnowprefetch cpuid_fault epb cat_l3 cdp_l3 invpcid_single intel_ppin ssbd mba ibrs ibpb stibp ibrs_enhanced tpr_shadow vnmi flexpriority ept vpid ept_ad fsgsbase tsc_adjust bmi1 hle avx2 smep bmi2 erms invpcid cqm mpx rdt_a avx512f avx512dq rdseed adx smap clflushopt clwb intel_pt avx512cd avx512bw avx512vl xsaveopt xsavec xgetbv1 xsaves cqm_llc cqm_occup_llc cqm_mbm_total cqm_mbm_local dtherm ida arat pln pts pku ospke avx512_vnni md_clear flush_l1d arch_capabilities


(3) virtualization 関連のパッケージをインストール
# dnf module install -y virt


(4) その他の必要なツールをインストール
# dnf install -y libvirt virt-install virt-viewer libguestfs-tools-c


(5) kvm カーネルモジュールが導入されていることを確認
# lsmod | grep kvm
kvm_intel             315392  0
kvm                   847872  1 kvm_intel
irqbypass              16384  1 kvm


(6) libvirtd サービスを有効化および起動
# sudo systemctl enable --now libvirtd
以上で環境の事前準備は完了となります。
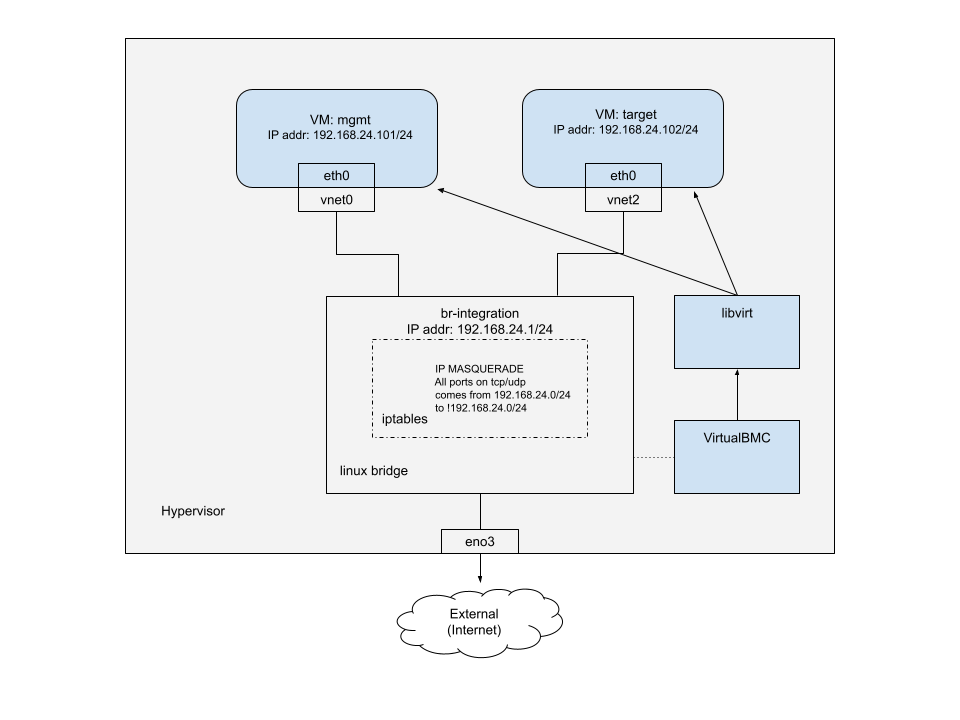
続いて、仮想ネットワーク br-integration を1つと、サーバの状態を確認する管理用VM mgmt と、管理される側のVM target という2つのVM作成していきます。
ipmitool は mgmt VM から実行する想定となります。
仮想ネットワークを作成
(1) 仮想ネットワークの初期状態を確認(default ネットワークは libvirt 起動時に作成される)
# virsh net-list
 Name      State    Autostart   Persistent
--------------------------------------------
 default   active   yes         yes


(2) br-integration ネットワークの定義ファイルを作成
# cat << EOF > br-integration.xml
<network>
  <name>br-integration</name>
  <bridge name='br-integration' zone="libvirt"/>
  <forward mode='nat'>
    <nat>
      <port start='1024' end='65535'/>
    </nat>
  </forward>
  <ip address='192.168.24.1' netmask='255.255.255.0'/>
</network>
EOF


(3) br-integration.xml からネットワーク定義をインポート
# virsh net-define br-integration.xml
Network br-integration defined from br-integration.xml


(4) br-integration ネットワークの自動起動を有効化
# virsh net-autostart br-integration
Network br-integration marked as autostarted


(5) br-integration ネットワークを起動
# virsh net-start br-integration
Network br-integration started


(6) 仮想ネットワークの状態を確認
# virsh net-list
 Name             State    Autostart   Persistent
---------------------------------------------------
 br-integration   active   yes         yes
 default          active   yes         yes
mgmt という名前で VM を作成
(1) mgmt という名前で 15GB の空のディスクイメージを作成
# qemu-img create -f qcow2 /var/lib/libvirt/images/mgmt.qcow2 15G
Formatting '/var/lib/libvirt/images/mgmt.qcow2', fmt=qcow2 size=16106127360 cluster_size=65536 lazy_refcounts=off refcount_bits=16


(2) RHEL8.4 イメージに含まれている /dev/sda3 パーティションを拡張しつつ、イメージを mgmt ディスクイメージにコピー
# virt-resize --expand /dev/sda3 /var/lib/libvirt/images/rhel-8.4-x86_64-kvm.qcow2 /var/lib/libvirt/images/mgmt.qcow2
[   0.0] Examining /var/lib/libvirt/images/rhel-8.4-x86_64-kvm.qcow2
**********

Summary of changes:

/dev/sda1: This partition will be left alone.

/dev/sda2: This partition will be left alone.

/dev/sda3: This partition will be resized from 9.9G to 14.9G.  The
filesystem xfs on /dev/sda3 will be expanded using the ‘xfs_growfs’
method.

**********
[   3.3] Setting up initial partition table on /var/lib/libvirt/images/mgmt.qcow2
[  14.1] Copying /dev/sda1
[  14.2] Copying /dev/sda2
[  14.2] Copying /dev/sda3
 100% ⟦▒▒▒▒▒▒▒▒▒▒▒▒▒▒▒▒▒▒▒▒▒▒▒▒▒▒▒▒▒▒▒▒▒▒▒▒▒▒▒▒▒▒▒▒▒▒▒▒▒▒▒▒▒▒▒▒▒▒▒▒▒▒▒▒▒▒▒▒▒▒▒▒▒▒▒▒▒▒▒▒▒▒▒▒▒▒▒▒▒▒▒▒▒▒▒▒▒▒▒▒▒▒▒▒▒▒▒▒▒▒▒▒▒▒▒▒▒▒▒▒▒▒▒▒▒▒▒▒▒▒▒▒▒▒▒▒▒▒▒▒▒▒▒▒⟧ 00:00
[  24.8] Expanding /dev/sda3 using the ‘xfs_growfs’ method

Resize operation completed with no errors.  Before deleting the old disk,
carefully check that the resized disk boots and works correctly.


(3) mgmt イメージの root パスワードを設定し cloud-init パッケージをアンインストール
# virt-customize -a /var/lib/libvirt/images/mgmt.qcow2 --root-password password:password --uninstall cloud-init
[   0.0] Examining the guest ...
[   4.7] Setting a random seed
[   4.7] Setting the machine ID in /etc/machine-id
[   4.7] Uninstalling packages: cloud-init
[   5.9] Setting passwords
[   7.0] Finishing off


(4) 作成した mgmt イメージを使用して mgmt という名前で VM を起動
# virt-install --name mgmt --memory 1536 --vcpus 3 --disk /var/lib/libvirt/images/mgmt.qcow2 --import --os-variant rhel8.4 --network network=br-integration --noautoconsole

Starting install...
Domain creation completed.


(5) mgmt VM が起動していることを確認
# virsh list
 Id   Name   State
----------------------
 4    mgmt   running
target という名前で VM を作成
(1) target という名前で 15GB の空のディスクイメージを作成
# qemu-img create -f qcow2 /var/lib/libvirt/images/target.qcow2 15G
Formatting '/var/lib/libvirt/images/target.qcow2', fmt=qcow2 size=16106127360 cluster_size=65536 lazy_refcounts=off refcount_bits=16


(2) RHEL8.4 イメージに含まれている /dev/sda3 パーティションを拡張しつつ、イメージを target ディスクイメージにコピー
# virt-resize --expand /dev/sda3 /var/lib/libvirt/images/rhel-8.4-x86_64-kvm.qcow2 /var/lib/libvirt/images/target.qcow2
[   0.0] Examining /var/lib/libvirt/images/rhel-8.4-x86_64-kvm.qcow2
**********

Summary of changes:

/dev/sda1: This partition will be left alone.

/dev/sda2: This partition will be left alone.

/dev/sda3: This partition will be resized from 9.9G to 14.9G.  The
filesystem xfs on /dev/sda3 will be expanded using the ‘xfs_growfs’
method.

**********
[   2.8] Setting up initial partition table on /var/lib/libvirt/images/target.qcow2
[  13.7] Copying /dev/sda1
[  13.7] Copying /dev/sda2
[  13.8] Copying /dev/sda3
 100% ⟦▒▒▒▒▒▒▒▒▒▒▒▒▒▒▒▒▒▒▒▒▒▒▒▒▒▒▒▒▒▒▒▒▒▒▒▒▒▒▒▒▒▒▒▒▒▒▒▒▒▒▒▒▒▒▒▒▒▒▒▒▒▒▒▒▒▒▒▒▒▒▒▒▒▒▒▒▒▒▒▒▒▒▒▒▒▒▒▒▒▒▒▒▒▒▒▒▒▒▒▒▒▒▒▒▒▒▒▒▒▒▒▒▒▒▒▒▒▒▒▒▒▒▒▒▒▒▒▒▒▒▒▒▒▒▒▒▒▒▒▒▒▒▒▒⟧ 00:00
[  24.4] Expanding /dev/sda3 using the ‘xfs_growfs’ method

Resize operation completed with no errors.  Before deleting the old disk,
carefully check that the resized disk boots and works correctly.


(3) mgmt イメージの root パスワードを設定し cloud-init パッケージをアンインストール
# virt-customize -a /var/lib/libvirt/images/target.qcow2 --root-password password:password --uninstall cloud-init
[   0.0] Examining the guest ...
[   4.7] Setting a random seed
[   4.7] Setting the machine ID in /etc/machine-id
[   4.7] Uninstalling packages: cloud-init
[   6.0] Setting passwords
[   7.1] Finishing off


(4) 作成した mgmt イメージを使用して mgmt という名前で VM を起動
# virt-install --name target --memory 1536 --vcpus 3 --disk /var/lib/libvirt/images/target.qcow2 --import --os-variant rhel8.4 --network network=br-integration --noautoconsole

Starting install...
Domain creation completed.


(5) target VM が起動していることを確認
# virsh list
 Id   Name     State
------------------------
 4    mgmt     running
 8    target   running
VirtualBMC をセットアップ
(1) pip をあらかじめ最新化
# pip3 install --upgrade pip

.... 省略 ...

(2) VirtualBMC をインストール
# pip3 install virtualbmc

... 省略 ...

(3) VirtualBMC を起動
# vbmcd


(4) mgmt 用の VirtualBMC を作成
# vbmc add mgmt --port 6230 --username admin --password password


(5) target 用の VirtualBMC を作成
# vbmc add target --port 6231 --username admin --password password


(6) mgmt 用の VirtualBMC を起動
# vbmc start mgmt


(7) target 用の VirtualBMC を起動
# vbmc start target


(8) VirtualBMC 用の Firewall 設定を追加
# firewall-cmd --zone libvirt --add-port 6230-6231/udp --permanent


(9) firewall ルールを再読み込み
# firewall-cmd --reload
mgmt VM 内で NIC, repository 等を設定および ipmitool をインストール
(1) mgmt VM へ root ユーザでログイン
# virsh console mgmt
Connected to domain mgmt
Escape character is ^]

Red Hat Enterprise Linux 8.4 (Ootpa)
Kernel 4.18.0-305.el8.x86_64 on an x86_64

Activate the web console with: systemctl enable --now cockpit.socket

localhost login:


(2) "Wired connection 1" のインターフェース設定を eth0 用に変更
# nmcli connection modify "Wired connection 1" connection.id "eth0"


(3) eth0 に割り当てる IP アドレス、DNS、デフォルトゲートウェイ等を設定
# nmcli connection modify eth0 connection.interface-name eth0 ipv4.method manual ipv4.address 192.168.24.101 ipv4.dns 192.168.24.1  ipv4.gateway 192.168.24.1


(4) connection を起動し eth0 に設定を反映
# nmcli connection up eth0
Connection successfully activated (D-Bus active path: /org/freedesktop/NetworkManager/ActiveConnection/16)


(5) eth0 の状態を確認
# ip a
1: lo: <LOOPBACK,UP,LOWER_UP> mtu 65536 qdisc noqueue state UNKNOWN group default qlen 1000
    link/loopback 00:00:00:00:00:00 brd 00:00:00:00:00:00
    inet 127.0.0.1/8 scope host lo
       valid_lft forever preferred_lft forever
    inet6 ::1/128 scope host
       valid_lft forever preferred_lft forever
2: eth0: <BROADCAST,MULTICAST,UP,LOWER_UP> mtu 1500 qdisc fq_codel state UP group default qlen 1000
    link/ether 52:54:00:8d:7d:30 brd ff:ff:ff:ff:ff:ff
    inet 192.168.24.101/32 scope global noprefixroute eth0
       valid_lft forever preferred_lft forever
    inet6 fe80::e11c:7457:cdff:2307/64 scope link noprefixroute
       valid_lft forever preferred_lft forever


(6) システムの登録情報を初期化
# subscription-manager clean
All local data removed

WARNING

The yum/dnf plugins: /etc/dnf/plugins/subscription-manager.conf, /etc/dnf/plugins/product-id.conf were automatically enabled for the benefit of Red Hat Subscription Management. If not desired, use "subscription-manager config --rhsm.auto_enable_yum_plugins=0" to block this behavior.


(7) システムを登録
# subscription-manager register
Registering to: subscription.rhsm.redhat.com:443/subscription
Username:
Password:


(8) 有効な Pool をアタッチ
# subscription-manager attach --pool=<pool-id>
Successfully attached a subscription for: <pool-name>


(9) 使用するパッケージのリリースを 8.4 に固定
# subscription-manager release --set=8.4


(10) すべてのリポジトリを無効化
# subscription-manager repos --disable=*

... 省略 ...


(11) 使用する2つのリポジトリを有効化
# subscription-manager repos --enable=rhel-8-for-x86_64-baseos-eus-rpms --enable=rhel-8-for-x86_64-appstream-eus-rpms
Repository 'rhel-8-for-x86_64-baseos-eus-rpms' is enabled for this system.
Repository 'rhel-8-for-x86_64-appstream-eus-rpms' is enabled for this system.


(12) パッケージを最新化
# dnf update -y

... 省略 ...


(13) ipmitool をインストール
# dnf install -y ipmitool

... 省略 ...
ipmitool で target VM を監視/操作できることを確認
(1) target VM が電源が起動状態であることを確認
# ipmitool -I lanplus -H 192.168.24.1 -p 6231 -U admin -P password power status
Chassis Power is on


(2) target VM の電源を停止
# ipmitool -I lanplus -H 192.168.24.1 -p 6231 -U admin -P password power off
Chassis Power Control: Down/Off


(3) このときの VM の状態をハイパーバイザ側で確認
# virsh list --all
 Id   Name     State
-------------------------
 4    mgmt     running
 -    target   shut off


(4) もう一度 mgmt VM から target VM を起動
# ipmitool -I lanplus -H 192.168.24.1 -p 6231 -U admin -P password power on
Chassis Power Control: Up/On


(5) 再度 target VM が起動状態となっていることをハイパーバイザ側で確認
# virsh list
 Id   Name     State
------------------------
 4    mgmt     running
 9    target   running
まとめ
ハイパーバイザ上で VM をベアメタルサーバかのように操作することができるようになるツール、 VirtulBMC を紹介しました。
レイヤーが高いんだか低いんだかよくわからない記事になりましたが、少しでも誰かの役に立っていれば幸いです。
また、クラウドが主流の時代において物理的なサーバを意識する回数は格段に減少しているかと思いますが、この記事をきっかけに興味をもって頂けた方がおられましたら、ぜひ遊んでみてください。